Hiking 101: the Basics of Mileage, Elevation and Routes
learn the basics of mileage, elevation and types of hiking routes to help you choose the best trails.
This is part 2 in my hiking 101 series that covers hiking and backpacking for beginners.
So you’ve found a hike—or perhaps you’re looking for one to go on—and the hike’s description includes a bundle of numbers and mumbo-jumbo words like “mileage,” “elevation,” “terrain,” and “trail type.” On their own, these terms describe what to expect from a trail, but what’s most important is understanding how these terms work together.
There are three main elements thrown in the pot when it comes to how “hard” a hike will be:
(a) how much elevation you’re climbing
(b) over how many miles
(c) the type of route it is
For example, there’s a big difference between a 2 mile hike with 1000 feet of elevation and a 10 mile hike with 2000 feet of elevation. The 2-miler may be shorter but you’ll likely have a bucket of sweat and a skyrocketing heart rate by the end of it. The 10-miler, on the other hand, is a slow and gradual climb. Which you find easier depends on your preferences, but for just about any hiker the 2-miler will be more challenging.
In this post, we will unpack the basics of hiking and breakdown how to understand hike summaries. This will help you determine a hike’s difficulty level beyond the subjective ratings of other people, and answer questions like, “how much elevation is a lot?” or “how hard will a hike be?” By the end of this post you’ll be a master at understanding hiking information and able to choose hiking trails with confidence.
If you are ready to head outside and need the gear to do it, check out Essential Gear for Day Hiking. To learn more about said gear alongside recommendations, Hiking 101: Hiking Gear for Beginners is your place to be.
If you need to back up things to the beginning, first check out Part I of my hiking series for beginners: How to Find Amazing Hikes.
Table of Contents
1. Types of Hiking Routes
2. Understanding Mileage
3. Understanding Elevation
4. How to Read Hike Summaries
Let’s get the easy part out of the way: hiking routes. Not all trails involve merely walking up and back down a mountain. In fact, there are several different types of trails that you will encounter. These are the three main types:
Out-and-Back
This is the good ‘ol classic hiking trail: you hike in one direction and then return the way you came. Plain and simple. Most hikes fall into this category.

Loop
This starts and ends in the same place, but instead of going back the way you came, you just do one big circle. This is my personal favorite because you have more variety during your hike.

Lollipop
Shaped like a lollipop (or deflated balloon?), this is an out-and-back-meets-loop hike. Around halfway, you do a small loop before meeting back up with the trial you started on.

Others terms you may come across are:
Point-to-Point | Start at one trailhead and end at a different one (requires pick-up/drop-off arrangements or multiple cars)
Thru-Hike | This is a point-to-point route over a much longer distance, typically 100+ miles. A popular thru-hike is the Pacific Crest Trail, which is a whopping 2,650 miles. They don’t have to be that long, of course. Many are closer to 20 miles.
Mileage is only one piece of the puzzle for determining a hike’s difficulty level. For beginners, the average hike will be in the 3-8 mile range without crazy elevation (that’s the other piece of the puzzle, which we’ll get to in a hot minute). Keep in mind that hikes are measured in total roundtrip distance, therefore a 5 mile roundtrip hike will be 2.5 miles up and 2.5 miles down.
For an idea of how long it takes to do a hike, consider that the average time it takes to walk a mile is 20 minutes, give or take a bit. When hiking uphill, elevation joins the party and a mile takes around 30 minutes or so to hike. As an experienced hiker, I usually do a 20-25 minute mile. That said, I’ve done my fair share of 45-minute miles when the mountain is a a demanding doozy. It all depends on your own speed, fitness level, and the trail’s terrain—things that all vary widely.

In tandem with mileage, elevation is what sets determines a trail’s difficulty. Understanding how it works is essential to choosing hikes that fit your experience level. When looking at hike summaries, there are typically two elevations listed and they are very, I repeat, very different. In the U.S., this is always measured in feet (ft), primarily because we are dum-dums that still haven’t hopped on the metric system train, but I digress. Outside of the U.S., it is measured in meters (m).
TIP!
1 meter = 3.3 feetWhen convervting, just divide or multiply by 3 for approximate elevation.
Elevation terms You Will See
Elevation / Highest Point | Where the hike’s end point sits above sea level.
Elevation Gain | The amount of elevation between the trailhead and the end point. This is the actual amount you will climb.
Generally, “elevation gain” or just “gain” is the number you care about. If hiking in winter, however, the “highest point” of elevation will be crucial as snow conditions are far different (read: dangerous) up at the top than down at a trailhead. “Highest point” is also good to know for altitude preparation.
You can see these terms in the example below:
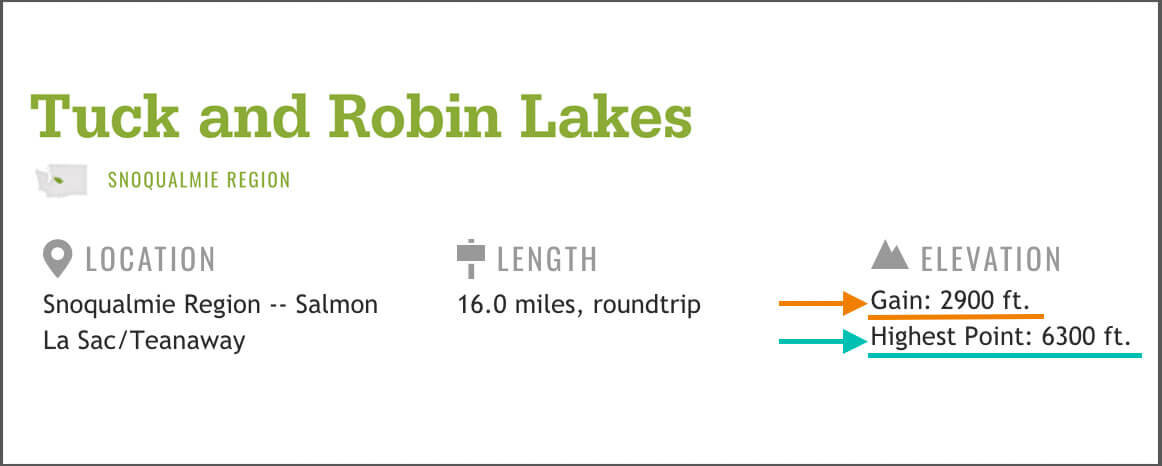
The elevation you will gain hiking Tuck and Robin Lakes is 2900 feet, while the highest point on the trail will be at 6300 feet above sea level. This means the trailhead starts 3400 ft above sea level.
So where do beginner hikers fit into all this elevation business? Well, there’s no hard and fast rule about how much elevation to tackle and it really depends on how many miles you’re going. When deciding how “hard” a hike will be, you typically measure elevation by the mile, which gives a ballpark idea of how steep it will be.
How to Measure Elevation per mile
For out-and-back hikes, divide the roundtrip mileage by two, then divide that number by the elevation gain. Loops and lollipop routes can be a bit trickier to measure.
Here’s an example for a 4 mile round trip out-and-back hike with 1000 elevation gain:
—> 4 miles divided by 2 = 2 miles (we’re dividing it by 2 because you’ll be hiking up, or gaining elevation, for two miles, then going down for the other 2 miles)
—> Divide 1000 ft of elevation gain by 2 miles = 500 ft gain per mile
Conclusion: This is a moderate hike.
General Elevation Guidelines
200-400 feet per mile | Easy
400-700 feet per mile | Moderate
700-1000 feet per mile | Difficult
1000+ feet per mile | Challenging
Keep in mind that elevation gain per mile is most helpful for shorter hikes (3-8 mile range) but can be a bit deceiving for longer hikes. For example, in the Tuck and Robin Lakes example above, the math would lead you to believe it is around 362 feet per mile (16 miles divided by 2 is 8 miles, then 2900 feet of elevation divided by 8 miles), which would normally fall under an easier amount of elevation to tackle. But—surprise!—it’s one of the most difficult backpacking trips I’ve ever done! That’s because the elevation gain is mostly within a 3 mile section and not spread evenly across all 8 miles. This makes the hike more like 850 feet of elevation gain per mile, which is challenging with thirty pounds on your back. This is why it’s important to look at elevation profiles (shown below) to get the full picture.
Elevation Profiles
These are handy summaries that show the change in elevation over the entirety of the hike. The horizontal x-axis is the length of the hike, while the vertical y-axis shows the change in feet you will climb during the hike. Some websites, like AllTrails, offer interactive profiles where you can hover over the red line and see more information for that particular section of the hike.
In the elevation profile below, it shows the first 3-4 miles as being totally flat, with the next 3-4 miles being a steady climb.

Grade
Elevation may also be expressed as “grade,” which measures the steepness or elevation at any given point on the trial. Think of it like a right angle, with degrees from 0°-90° (where zero is completely flat). The grade, expressed as a percentage, will vary along the trail, which is why it’s handy to look at an elevation profile to get a sense of what you’re in for during your hike and where. The higher the percentage, the steeper the climb.
Please refer to my artistic masterpiece below for a better idea:

As always, keep in mind that this is all a basic framework to help you, a beginner hiker, to prepare. For some, a 20% grade will be tough, for others it may come naturally. Perception of trail difficulty will vary from person to person based on fitness level, experience, and a variety of other factors. Everyone is different!
Alright, let’s bring it all home! Now that you know the ins and outs of routes, mileage and elevation, we can look at hiking summaries and figure out what all that gibberish is actually telling us. We’ll look at three different trails, all of which I have hiked myself.
1. Blanca Lake
Right off the bat, the summary below (you can follow along on AllTrails) suggests it’s a hard hike, as seen under the title “Blanca Lake Trial.” But let’s look at all the information and decide for ourselves.
It’s 7.0 miles—not bad, though the elevation gain of 3,372 looks pretty tough. It’s an out-and-back hike, so let’s figure out the average elevation gain to get a better idea of just how steep that’ll be.
Beep boop beep—math done!
Blanca Lakes comes out to 963 elevation gain per mile (7 miles/2 = 3.5 miles, then 3372 feet/3.5 miles=963 feet per mile). HOOWEE, that’s going to be a true thigh-burner and may not be the best for a beginner hiker. Let’s look at the elevation profile, as shown by the red line at the bottom, to get an even more accurate picture of the trail.


The consist upward line in the elevation profile above shows that it will indeed be a challenging hike. It looks like there will be a slight downhill section in the middle, but overall, the summary suggests that this will be a real workout for any hiker.
From hiking Blanca Lake myself I can tell you that it is, in fact, a challenge. With its unrelenting steepness, I was sweating like a pig and huffing and puffing the entire way. As an experienced hiker, I looked at the trial summary and read the trail reports and thought, “that’ll be a nice workout—but real tough!” If I were a beginning hiker, I may think, “hmm, that’s an intense level of elevation, maybe I’ll try a more gradual trail before tackling this one, or if I do it I’ll take my time.” You don’t need to be deterred, just understand what you’re in for.
2. Mirror Lake via Tom, Dick and Harry Mtn
For this one, let’s check out the Hiking Project, another great hiking resource. They file this hike under “intermediate,” or moderate, as seen under the trail name. Looking at the numbers on the bottom right, we can see that it is an 8.3 mile out-and-back trail that has a total elevation gain of 1,454 feet. That makes the average per mile elevation gain 350 ft. This is sizing up nicely as a beginner/intermediate hike!
Plus, we can see in the bottom-right corner that the average grade is 7%, which is like a walk in the park. There is, however, a portion or two that gets up to a maximum grade of 29%, which gives a nice little challenge. This is a great example of a trail for beginner and intermediate hikers!

3. Jenny Lake Loop
Let’s mosey over to Jenny Lake in the Grand Tetons, shall we? The first thing I see here is the elevation profile at the bottom; it’s all over the place with a lot of ups and downs. This may seem a bit intimidating at first glance, but let’s keep reading. Moving over to the summary on the left side, I see that it’s considered a moderate hike. Let’s see if that holds water.
First, I see that it’s a loop trail. This means that we won’t be dividing the roundtrip mileage in half as we would for an out-and-back trail that goes up and then down. For Jenny Lake, I see it’s 7.9 miles roundtrip and the elevation gain is 623 feet, which isn’t strenuous at all over that amount of miles. The average gain per mile is 78 feet—that’s easy peasy! The elevation profile shows that there will be short, steep sections at some points (which you can see is about 30% grade when you hover over the red line on AllTrails), but that’s nothing for such a short little bit.
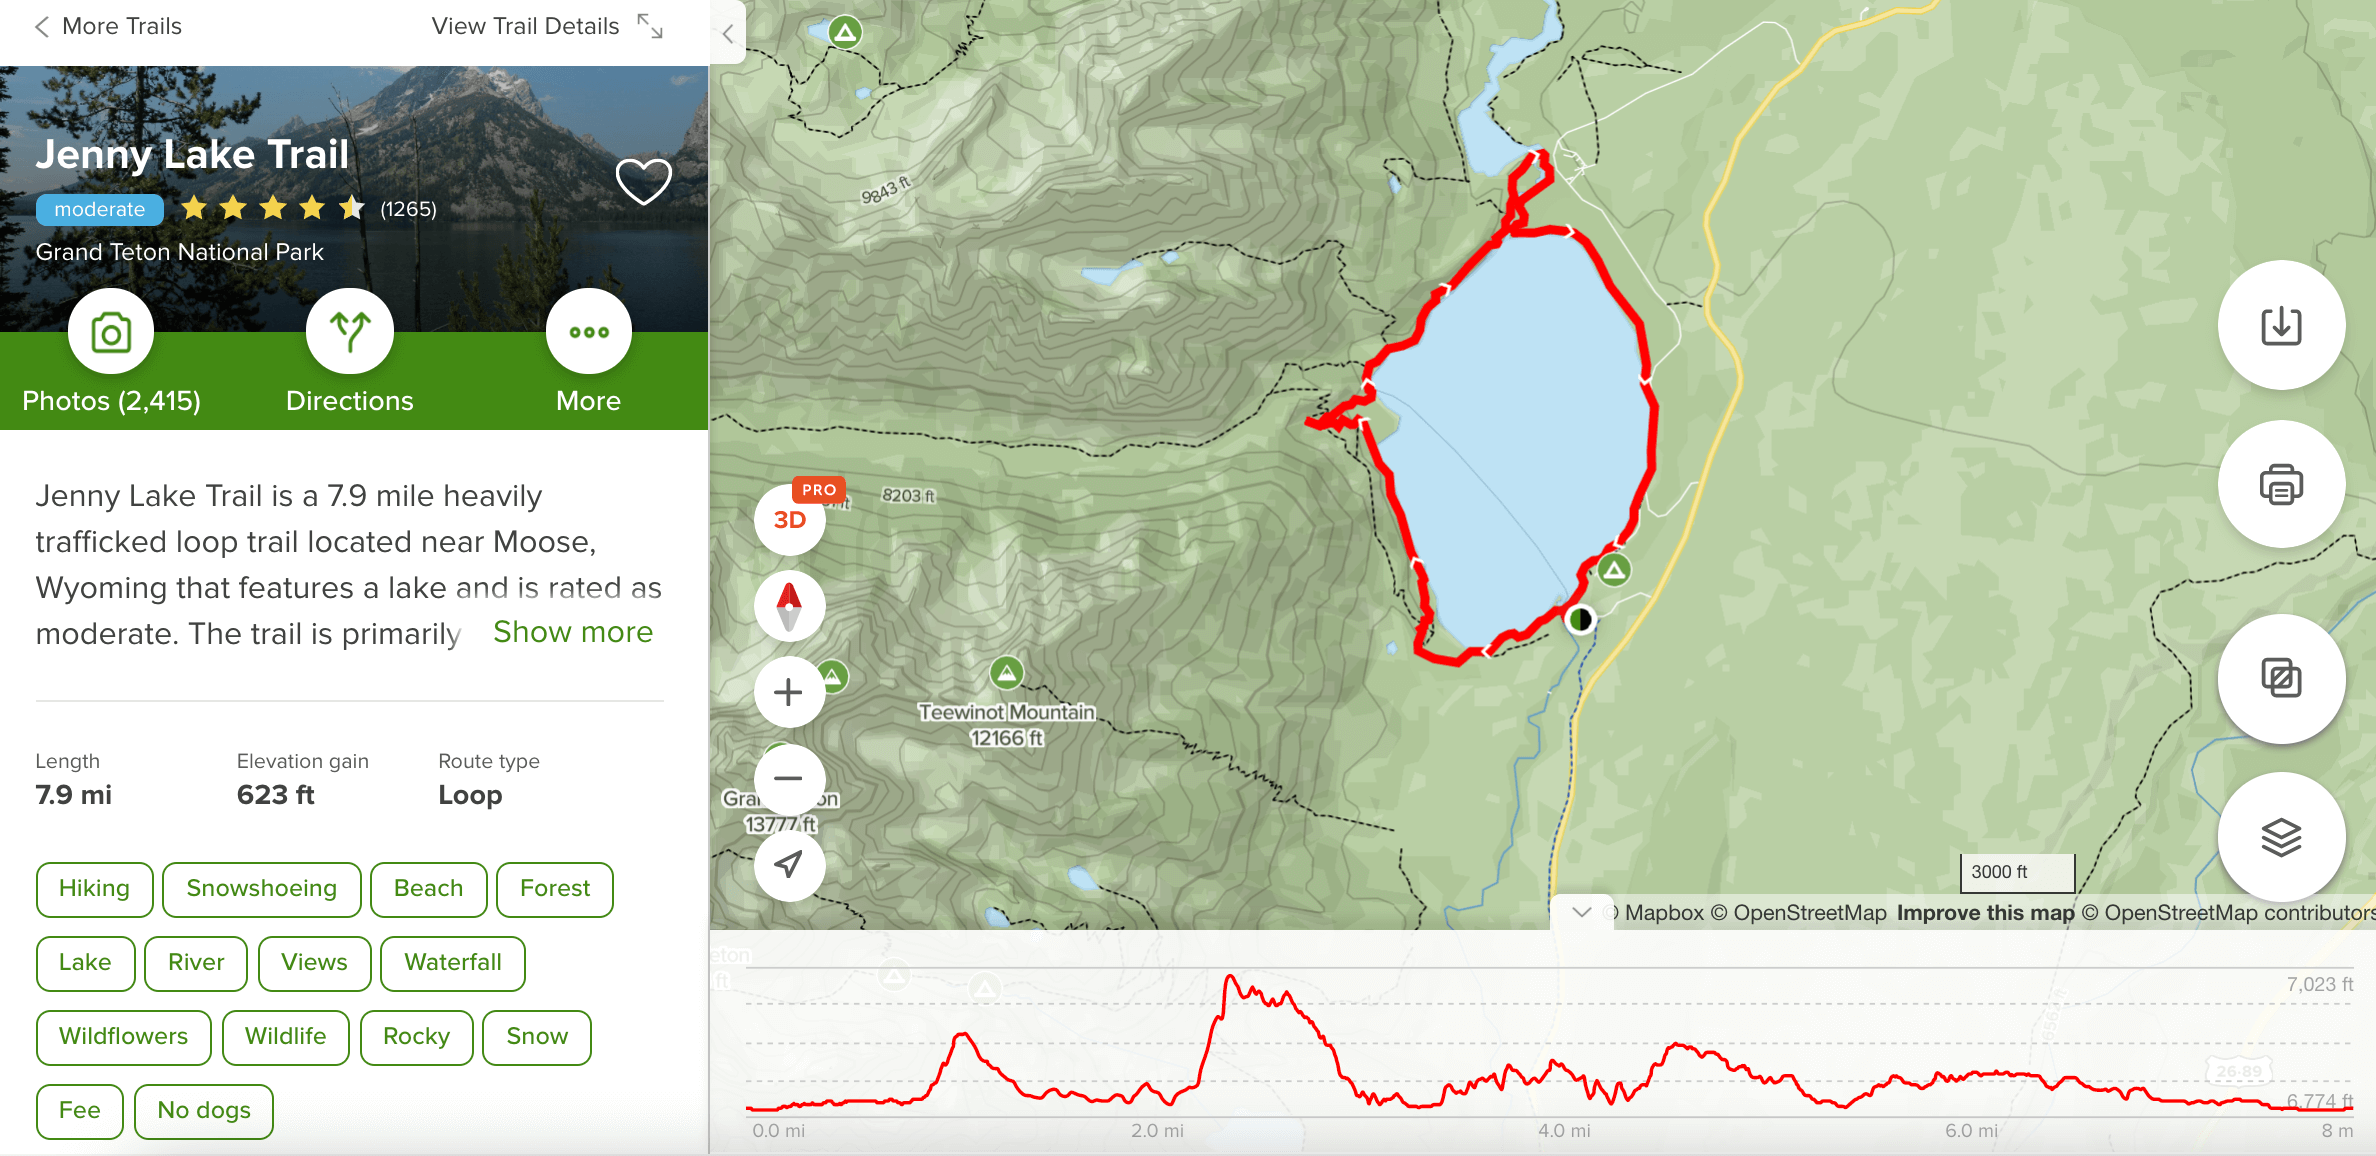
Since this is a loop hike, you can choose to go clockwise (CW) or (CCW). The elevation profile above shows it as a CW trail (in AllTrails you can hover the red line on the chart and it will move along on the map at the same time, allowing you to get a sense of where you’re at and which direction it’s showing).
According to AllTrails, by going CW you’ll get the steep sections out of the way in the beginning. If you choose to do it the opposite way (CCW), simply read the profile from right to left instead. For CCW, it shows that the steep sections will be near the end. Overall, this is an easy/moderate hike for beginners.
Did you get through all that information?
Good on you—you’re on your way to being a hiking aficionado!
Ready to learn even more? Check out all the posts from my Hiking 101 series.
Pin For Later:

You May Also Like: